
Adding a Garelick Eez-In Table Mount to your Boat
Question: I have a Yamaha / Chaparral / Scarab (or any other model) boat, but I don't have a table mount. Can I add one to my boat so that I can use your products?
Answer: Yes, but it's not as simple as just drilling four holes.
First, you have to determine a suitable location. By suitable I mean:
- The location MUST be at the correct angle to begin with.
- The location MUST be easily accessible from the back, in order to tighten the fasteners, without any interference.
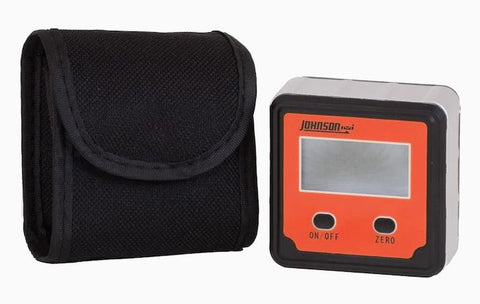
Ok, let's tackle number (1) above first. In order to do this, you need to have a digital angle finder. These are readily available at your local big box home improvement center, or your local hardware store, or online. You can get one for less than about $40 (or less than $10 if you go analog), and make a great addition to your tool box. Here's what they look like (Digital):
And for the less expensive option, good old analog:

So, the next thing you want to do is zero the meter. Put the device on the swim platform, then hit the ZERO button. The display should now read 0.0 even if your boat is at a slight angle on the trailer or in the water.

Next, simply move the meter up to the surface that you're thinking about, and make a measurement, keeping the buttons/display in horizontal position (i.e. don't rotate it 90 degrees). On Yamaha, this surface will be at just over 8 degrees, as shown below.

Yamaha also uses an angled spacer behind their mounts as shown below.

Now I'm not exactly sure why Yamaha did this, other than for the possible fact that they already had a table leg in the marketplace, and didn't want to obsolete it. In any case, if you currently have a 2014 or later Yamaha, and want to add another mount, you'll need to have the spacer.
Our Yamaha mount kits includes the spacer, and fasteners, and mount and backing plate - yep everything you need to add another mount to your boat.

Chaparral's on the other hand, have their mount on a perfectly vertical surface. So with the Garelick Eez-In taking away 3 degrees, the Chaparral legs / stanchions have a mounting plate welded to them that tilts back 3 degrees.

This is why it's important to make sure you order the correct mount, and install it on a surface at the correct angle.
Once you find a suitable location, then comes the fun - drilling the holes! Yeah, not really fun, because if you mess up, well let's just say: MEASURE TWICE CUT ONCE.
You'll want to get some masking tape, and put several strips of tape on at the location that you're putting the mount. This will aid in being able to see the hole locations that we'll make below. If you'd like a little more confidence in drilling holes in your gelcoat, here's a video I found on YouTube.
So before marking the holes, once again, it's imperative that you have the mount in the location you want, and that the mount is level. There are a number of ways to do this, but maybe the easiest is to find a a 1x2 piece of pine to put under the mount. Put your zeroed angle finder on top, and of course it should read zero when the mount is perfectly level. Use some masking tape to secure the mount in position. If the mount is not level, neither will your table or grill!
If you have a set of transfer punches, pull out the 17/64th punch, which fits nicely in the hole of the Garelick mount. Gently tap the transfer punch to put a light mark in the masking tape. Pull the punch out and look to make sure you can see the mark on the boat before you pull the mount off and start drilling!
Now, I would use a small bit to drill a pilot hole at each of the mark locations. use a 1/8" bit to drill your pilot. Now, your' ready to enlarge the holes. for the final hole, use a 9/32" bit, as the fasteners are 1/4"-20. If you want a bit more slop / adjustment, you can use a 5/16" bit.
Finally, drill the holes. You can now remove the masking tape from the surface. Now. using either a larger bit, or a countersinking bit gently countersink just the very edges of the gelcoat holes - this will help prevent spider cracking.
Hold your mount in position, with angle adapter (Yamaha) and put the backing plate in position behind the gelcoat, insert a fastener, put a washer on and a nut, and tighten it down. Repeat three times, and you're done!
John